Tsugaru: Difference between revisions
(→THE SKILLS: See https://p.eagate.573.jp/game/eacbg/bg/news/update/2/update240918.html for recent changes) |
|||
| (46 intermediate revisions by 7 users not shown) | |||
| Line 1: | Line 1: | ||
[[File:TsugaruSD.png|thumb|289x289px]] | [[File:TsugaruSD.png|thumb|289x289px| | ||
{| class="wikitable" style="width: 100%;" | |||
|+ | |||
! colspan="2" |Tsugaru | |||
|- | |||
|Birthday | |||
|December 24th | |||
|- | |||
|Type | |||
|Shooter | |||
|- | |||
|V.A. | |||
|Rie Kugimiya (釘宮 理恵) | |||
|}]] | |||
='''Tsugaru(ツガル)'''= | ='''Tsugaru(ツガル)'''= | ||
Tsugaru is the | Tsugaru is a guest character from the beatmania IIDX series that plays the role of a Shooter in Bombergirl. | ||
She | She boasts incredible range with her Horn Sniper Rifle Skill and Holy Night Mass, and is currently the fastest mobile shooter in the game with 4 max speed. | ||
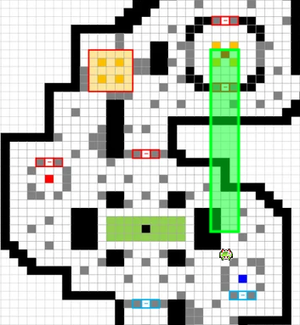
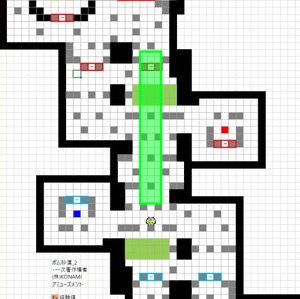
Compared to other shooters, Tsugaru's kit is deceiving. While it may look like she excels in close(bombs) and long range(guns) combat, her default skills against the ever increasing roster leaves a lot to be desired. To play this character effective, a controller is necessary to take advantage of her movement and angles. | |||
{| class="wikitable" | |||
|+ | |||
| | |||
{| class="wikitable" | {| class="wikitable" | ||
|+ | |+Stat decrease priority | ||
! | ! | ||
! | ![[File:Icon bomb.png|center|frameless|25x25px]] | ||
! | ![[File:Icon fire.png|center|frameless|25x25px]] | ||
! | ![[File:Icon speed.png|center|frameless|25x25px]] | ||
! | |- | ||
!<big>6</big> | |||
| | |||
|<big>①</big> | |||
| | |||
|- | |||
!<big>5</big> | |||
| | |||
|<big>②</big> | |||
| | |||
|- | |||
!<big>4</big> | |||
| | |||
|<big>③</big> | |||
|<big>⑤</big> | |||
|- | |||
!<big>3</big> | |||
|<big>⑥</big> | |||
|<big>④</big> | |||
|<big>⑧</big> | |||
|- | |||
!<big>2</big> | |||
| | |||
|<big>⑦</big> | |||
| | |||
|- | |||
!<big>1</big> | |||
| | |||
| | |||
| | |||
|} | |||
| | |||
{| class="wikitable" | |||
|+Team Level Max HP | |||
!Lv | |||
!Max HP | |||
|- | |- | ||
|1 | |1 | ||
|110 | |||
|- | |||
|2 | |2 | ||
| | |120 | ||
|- | |||
|3 | |||
|130 | |||
|- | |||
|4 | |||
|140 | |||
|- | |||
|5 | |||
|150 | |||
|} | |||
| | |||
{| class="wikitable" | |||
|+Character stats | |||
!Stat | |||
!Min | |||
!Max | |||
|- | |- | ||
| | |Bombs | ||
|2 | |||
|3 | |3 | ||
|- | |||
|Fire | |||
|1 | |||
|6 | |6 | ||
|- | |||
|Speed | |||
|2 | |||
|4 | |4 | ||
|} | |} | ||
|} | |||
=='''THE SKILLS'''== | |||
[[File:SKILL SHOOT SNIPER.png|left|214x214px|thumb|''"This Horn Sniper Rifle isn't just for show!"'']] | |||
Skill Description: Shoot at the enemy with a sniper rifle. | '''Horn Sniper Rifle(ホーンスナイパーライフル) - Default Skill #1''' | ||
''Skill Description: Shoot at the enemy with a sniper rifle.'' | |||
{| class="wikitable" | {| class="wikitable" | ||
!Team | !Rank | ||
!Damage( | !0 | ||
! 1 | |||
!2 | |||
!3 | |||
! 4 | |||
!5 | |||
!6 | |||
!7 | |||
!8 | |||
!9 | |||
!10 | |||
|- | |||
|Cooldown | |||
|12s | |||
|11.88 | |||
|11.76 | |||
|11.64 | |||
|11.52 | |||
|11.4 | |||
|11.28 | |||
|11.16 | |||
|11.04 | |||
|10.92 | |||
|10.8s | |||
|} | |||
{| class="wikitable" | |||
!Team lvl | |||
!Damage (Structure) | |||
!Range | !Range | ||
!Cooldown | !Cooldown | ||
!Cast | !Cast Time | ||
!Angle | |||
!I-frame(s) | |||
|- | |- | ||
|2 | |2 | ||
| | |90 (45) | ||
| | |1x12 in front | ||
|12s | |12s | ||
|~0.4s | |~0.4s | ||
|16 Directions (360) | |||
|None | |||
|} | |} | ||
<br /> | |||
<br /> | |||
{| style="text-align:left;" | |||
|- style="vertical-align:top;" | |||
|[[File:TsugaruSniperRifleBETA0001.png|border|left|frameless|201x201px]] | |||
| | |||
* A fast shooting attack. Tsugaru holds the rifles for a split second before shooting two shots. | |||
* The range is immense. The bullets can travel over blocks, walls, allies, and allied structures but will be sucked if it damages an enemy or enemy structure. | |||
*If an enemy is at low HP and nearby another, the bullets will pierce and hit both players. | |||
*The best way to use this skill is in narrow pathways and when the enemy is standing still. The opportune moment to strike is after the attacker places a bomb then retreats behind a block. | |||
*Most importantly, do not panic shoot. | |||
|} | |||
''' | ---- | ||
[[File:SKILL SHOOT LAUNCHER.png|left|214x214px|thumb|''"Target locked. Firing!"'']] | |||
'''Hyper-Electromagnetic Launcher(ハイパーエレクトロマグネティックランチャー) - ''Default Skill #2''''' | |||
''Skill Description: Fires an intense, ultra-long-distance beam forward. She cannot move for a moment due to the shock.'' | |||
{| class="wikitable" | |||
!Rank | |||
!0 | |||
!1 | |||
!2 | |||
!3 | |||
Skill Description: Fires an intense, ultra-long-distance beam forward. She cannot move for a moment due to the shock. | !4 | ||
!5 | |||
!6 | |||
!7 | |||
!8 | |||
!9 | |||
!10 | |||
|- | |||
|Cooldown | |||
| 50s | |||
| | |||
| | |||
| | |||
| | |||
| | |||
| | |||
| | |||
| | |||
| | |||
|45s | |||
|} | |||
{| class="wikitable" | {| class="wikitable" | ||
!Team | ! Team lvl | ||
!Damage( | !Damage (Structures) | ||
!Range | !Range | ||
!Cooldown | !Cooldown | ||
!Cast | !Cast Time | ||
!Angle | |||
! I-frame(s) | |||
|- | |- | ||
|5 | |5 | ||
|300(150) | |300 (150) | ||
|3x22 | |3x22 in front | ||
|50s | |50s | ||
| | |2.66s | ||
|4 Directions | |||
|Yes | |||
|} | |} | ||
<br /> | |||
<br /> | |||
{| style="text-align:left;" | |||
|- style="vertical-align:top;" | |||
|[[File:TsugaruEMLBETA0001.png|border|left|frameless|255x255px]] | |||
| | |||
*Tsugaru fires an intense ultra long distance beam forward. She's immobile during and after the attack. | |||
*The beam pierce through everything making it strong in tight corridors during the beginning digging phase. | |||
*Because of the brief recovery after the skill is finished, it is not wise to use this near enemy players as they will use the chance to surround Tsugaru with bombs. | |||
*On certain maps, it is advantageous for Tsugaru to move from her defensive position to attack the enemy's gate or base. | |||
|} | |||
---- | |||
[[File: | [[File:SKILL SHOOT APPLE.png|left|214x214px|thumb|''"Think fast!"'']] | ||
'''Apple Stun Cider(アップルスタンサイダー) - ''Alt Skill #1''''' | |||
''Skill Description: Throw a Apple-Grenade forward that creates a stun field.'' | |||
'' | {| class="wikitable" | ||
!Rank | |||
! 0 | |||
!1 | |||
!2 | |||
!3 | |||
!4 | |||
!5 | |||
!6 | |||
!7 | |||
!8 | |||
!9 | |||
!10 | |||
|- | |||
|Cooldown | |||
|15s | |||
| | |||
| | |||
| | |||
| | |||
| | |||
| | |||
| | |||
| | |||
| | |||
|13.5s | |||
|} | |||
{| class="wikitable" | {| class="wikitable" | ||
!Team | !Team lvl | ||
!Damage | !Damage | ||
!Range | !Range | ||
!Cooldown( | !Cooldown | ||
!Cast Time | |||
!Angle | |||
!I-frame(s) | |||
|- | |- | ||
|3 | |3 | ||
|0(stun) | |0 (2.53s stun) | ||
| | |2.5 Radius (thrown 5 spaces) | ||
|15s | |15s | ||
|1s | |1s | ||
|8 Directions | |||
|Yes (on startup) | |||
|} | |} | ||
<br /> | |||
<br /> | |||
{| style="text-align:left;" | |||
|- style="vertical-align:top;" | |||
|[[File:TsugaruApuruPieBETA0001.png|border|left|frameless|229x229px]] | |||
| | |||
*Tsugaru throws an apple bomb that stuns for a brief time. The grenade goes over everything so don't worry about it getting sucked. | |||
*Combos well into her horn sniper rifle skills. | |||
|} | |||
---- | |||
[[File:SKILL SHOOT HOLYNIGHTMASS.png|left|214x214px|thumb|''"Firing mah lasers!"'']] | |||
'''Holy Night Mass(ホーリィナイト・ミサ) - Alt Skill #2''' | |||
''Skill Description: Fire a succession of shots at the enemy with a sniper rifle.'' | |||
{| class="wikitable" | |||
!Rank | |||
!0 | |||
!1 | |||
! 2 | |||
!3 | |||
! 4 | |||
!5 | |||
!6 | |||
!7 | |||
!8 | |||
!9 | |||
!10 | |||
|- | |||
|Cooldown | |||
|12s | |||
| | |||
| | |||
| | |||
| | |||
| | |||
| | |||
| | |||
| | |||
| | |||
|19.8s | |||
|} | |||
{| class="wikitable" | {| class="wikitable" | ||
!Team | !Team lvl | ||
!Damage( | !Damage (Structures) | ||
!Range | !Range | ||
!Cooldown | !Cooldown | ||
!Cast | !Cast Time | ||
!Angle | |||
!I-frame(s) | |||
|- | |- | ||
|4 | |4 | ||
|60(30) x 8 | |60 (30) x 8 | ||
|3x9 | |3x9 in front | ||
|25s | |25s | ||
|~0.5s | |~0.5s | ||
|16 Directions (360) | |||
|Yes (triggers on hit) | |||
|} | |} | ||
<br /> | |||
<br /> | |||
{| style="text-align:left;" | |||
|- style="vertical-align:top;" | |||
|[[File:TsugaruHNMBETA0001.png|border|frameless|300x300px]] | |||
| | |||
*Fires a quick succession of shots at the enemy with both rifles. Multiple enemies can be harmed if they are in the line of fire. | |||
*Like Horn Sniper Rifle, Bullets interact the same with blocks, walls, allies, allied structures and are absorbed by enemy mimbos/servants and sturctures. | |||
*While the ability can fire multiple shots in a general area, enemies can only be harmed '''ONCE'''. | |||
*Contrary to Horn Sniper Rifle, enemy structures can be hit multiple times by this skill.<blockquote>'''NOTE:''' Damage to structures depend on the amount of squares taken covered in front of it. 120 damage for 1 square, 180 for 2 squares, and 240 damage for 3 squares.</blockquote> | |||
|} | |||
=='''Strategy and Tactics'''== | |||
*Will be expanded on** | |||
*Shots tend to come out quickly compared to other shooters. Use this to your advantage. | |||
* | *Horn Sniper Rifle has ridiculous range. You can shoot people off screen if you use the mini-map as your guide. | ||
{| class="wikitable mw-collapsible mw-collapsed" style="width:600px;" | |||
|+<big>Hyper Electronic Launcher optimal shot locations</big> | |||
! | |||
{| class="wikitable mw-collapsible mw-collapsed" style="width:600px;" | |||
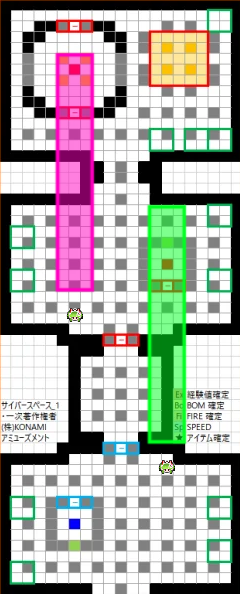
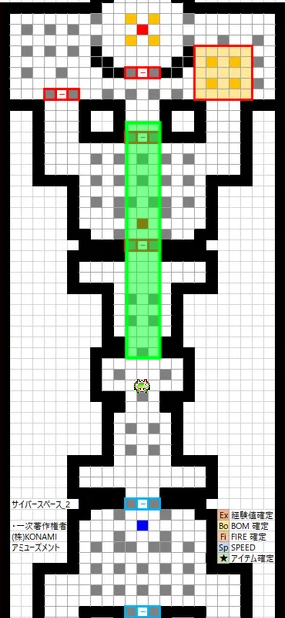
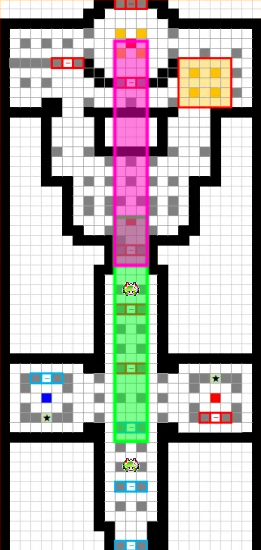
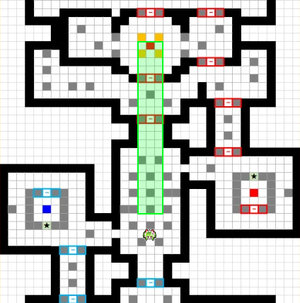
|+Bomb Town | |||
|[[File:Tsugaru EML1.png|frameless]]Bomb Town 2.1 | |||
* | |- | ||
* Shots tend to come out quickly compared to other shooters. Use this to your advantage. | |[[File:Tsugaru EML2.png|frameless]]Bomb Town 4 | ||
* Horn Sniper Rifle has ridiculous range. You can shoot people off screen if you use the mini-map as your guide. | |} | ||
{| class="wikitable mw-collapsible mw-collapsed" style="width:600px;" | |||
|+Aqua Castle | |||
|[[File:Tsugaru eml 14.png|frameless]]Aqua Castle 2 | |||
|- | |||
|[[File:Tsugaru eml 15.png|frameless]]Aqua Castle 3 | |||
|- | |||
|Aqua Castle 5 | |||
Strongly not recommended to use EML | |||
|} | |||
{| class="wikitable mw-collapsible mw-collapsed" style="width:600px;" | |||
|+KakaKuri | |||
|[[File:Tsugaru eml3.png|frameless]]Kakakuri 1 | |||
|- | |||
|[[File:Tsugaru eml4.png|left|frameless]]Kakakuri 2 | |||
<small>Not a recommended snipe to take as it puts burden on Tsugaru's blocker. The EML is better used to ward off the enemy offensive arriving from the left, then use Apple Stun Cider or Holy Night Mass.</small> | |||
|- | |||
|[[File:Tsugaru eml5.png|left|frameless]]Kakakuri 3 | |||
<small>A toss up whether or not Tsugaru gets this shot. EXP is sparse and often the enemy offensive will have an easy time getting to the respawn tower and gate. If possible, snipe using plan B position. After the stones are cleared Tsugaru will have an easier time getting in position for plan A where she can assist the offensive team assault the tower and gates.</small> | |||
|- | |||
|Kakakuri 4.1 | |||
Strongly not recommended to use EML | |||
|- | |||
|[[File:Tsugaru eml6.png|left|frameless]]Kakakuri Twilight | |||
<small>Highly recommended shot for Tsugaru to take. Getting to the middle and damaging the enemy gates eases the job of getting in for Tsugaru's offensive team. If the middle section is too heated then the shot can be made from plan B.</small> | |||
|} | |||
{| class="wikitable mw-collapsible mw-collapsed" style="width:600px;" | |||
|+Panic Island | |||
|[[File:Tsugaru eml7.png|frameless]]Panic Island 1 | |||
|- | |||
|[[File:Tsugaru eml 8.png|frameless]]Panic Island 2.1 | |||
|- | |||
|Panic Island 6 | |||
Strongly not recommend to use EML | |||
|} | |||
{| class="wikitable mw-collapsible mw-collapsed" style="width:600px;" | |||
|+Cyber Space | |||
|[[File:Tsugaru eml9.png|frameless]]Cyber Space 1 | |||
|- | |||
|[[File:Tsugaru eml10.png|frameless]]Cyber Space 2 | |||
|- | |||
|[[File:Tsugaru eml11.png|frameless]]Cyber Space 3 | |||
|- | |||
|[[File:Tsugaru eml 16.png|left|frameless]]Cyber Space 4 | |||
<small>Considered Tsugaru's best map for EML because of its strong opening. Reaching level 5 first is a must to take the advantage. It is an easy snipe so the enemy Tsugaru may retaliate.</small> | |||
|} | |||
{| class="wikitable mw-collapsible mw-collapsed" style="width:600px;" | |||
|+Bomb Desert | |||
|[[File:Tsugaru eml12.png|left|frameless]]Bomb Desert 1 | |||
<small>Possible, very easy, but Tsugaru has to go out of her way to snipe from here. The map is small and the blocker will need Tsugaru to cover her blind spots. This shot has to be planned and the team must reach level 5 first early in the beginning of the match.</small> | |||
|- | |||
|[[File:Tsugaru eml 13.png|left|frameless]]Bomb Desert 2 | |||
<small>It is easy to collect EXP and reach level 5. this shot is highly recommended to create an opening for Tsugaru's offensive team. However be wary that the enemy shooter will return this snipe (Tsugaru EML, Emera Omega Delete, Olive Act Homing, etc)</small> | |||
|} | |||
{| class="wikitable mw-collapsible mw-collapsed" style="width:600px;" | |||
|+Chilly Village | |||
|Strongly not recommended to use EML | |||
|} | |||
|- | |||
| | |||
|} | |||
=='''Fun Facts'''== | =='''Fun Facts'''== | ||
Birthday: December 24th | Birthday: December 24th | ||
Latest revision as of 05:00, 19 September 2024
Tsugaru(ツガル)[edit | edit source]
Tsugaru is a guest character from the beatmania IIDX series that plays the role of a Shooter in Bombergirl.
She boasts incredible range with her Horn Sniper Rifle Skill and Holy Night Mass, and is currently the fastest mobile shooter in the game with 4 max speed.
Compared to other shooters, Tsugaru's kit is deceiving. While it may look like she excels in close(bombs) and long range(guns) combat, her default skills against the ever increasing roster leaves a lot to be desired. To play this character effective, a controller is necessary to take advantage of her movement and angles.
|
|
|
THE SKILLS[edit | edit source]
Horn Sniper Rifle(ホーンスナイパーライフル) - Default Skill #1
Skill Description: Shoot at the enemy with a sniper rifle.
| Rank | 0 | 1 | 2 | 3 | 4 | 5 | 6 | 7 | 8 | 9 | 10 |
|---|---|---|---|---|---|---|---|---|---|---|---|
| Cooldown | 12s | 11.88 | 11.76 | 11.64 | 11.52 | 11.4 | 11.28 | 11.16 | 11.04 | 10.92 | 10.8s |
| Team lvl | Damage (Structure) | Range | Cooldown | Cast Time | Angle | I-frame(s) |
|---|---|---|---|---|---|---|
| 2 | 90 (45) | 1x12 in front | 12s | ~0.4s | 16 Directions (360) | None |
|
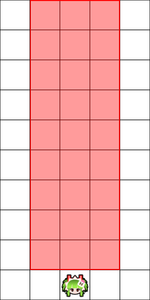
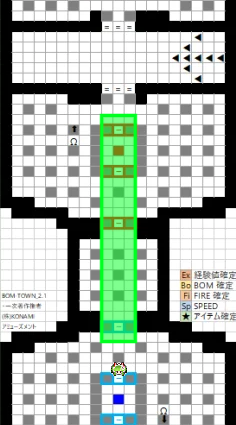
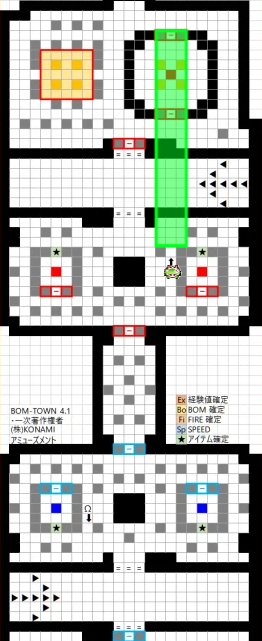
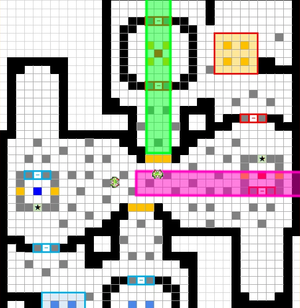
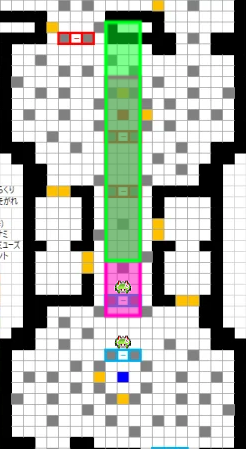
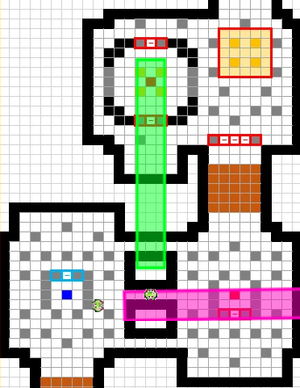
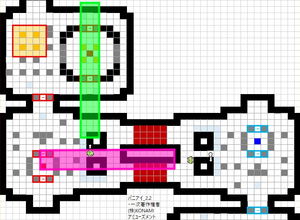
Hyper-Electromagnetic Launcher(ハイパーエレクトロマグネティックランチャー) - Default Skill #2
Skill Description: Fires an intense, ultra-long-distance beam forward. She cannot move for a moment due to the shock.
| Rank | 0 | 1 | 2 | 3 | 4 | 5 | 6 | 7 | 8 | 9 | 10 |
|---|---|---|---|---|---|---|---|---|---|---|---|
| Cooldown | 50s | 45s |
| Team lvl | Damage (Structures) | Range | Cooldown | Cast Time | Angle | I-frame(s) |
|---|---|---|---|---|---|---|
| 5 | 300 (150) | 3x22 in front | 50s | 2.66s | 4 Directions | Yes |
|
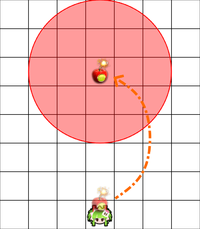
Apple Stun Cider(アップルスタンサイダー) - Alt Skill #1
Skill Description: Throw a Apple-Grenade forward that creates a stun field.
| Rank | 0 | 1 | 2 | 3 | 4 | 5 | 6 | 7 | 8 | 9 | 10 |
|---|---|---|---|---|---|---|---|---|---|---|---|
| Cooldown | 15s | 13.5s |
| Team lvl | Damage | Range | Cooldown | Cast Time | Angle | I-frame(s) |
|---|---|---|---|---|---|---|
| 3 | 0 (2.53s stun) | 2.5 Radius (thrown 5 spaces) | 15s | 1s | 8 Directions | Yes (on startup) |
|
Holy Night Mass(ホーリィナイト・ミサ) - Alt Skill #2
Skill Description: Fire a succession of shots at the enemy with a sniper rifle.
| Rank | 0 | 1 | 2 | 3 | 4 | 5 | 6 | 7 | 8 | 9 | 10 |
|---|---|---|---|---|---|---|---|---|---|---|---|
| Cooldown | 12s | 19.8s |
| Team lvl | Damage (Structures) | Range | Cooldown | Cast Time | Angle | I-frame(s) |
|---|---|---|---|---|---|---|
| 4 | 60 (30) x 8 | 3x9 in front | 25s | ~0.5s | 16 Directions (360) | Yes (triggers on hit) |
Strategy and Tactics[edit | edit source]
- Will be expanded on**
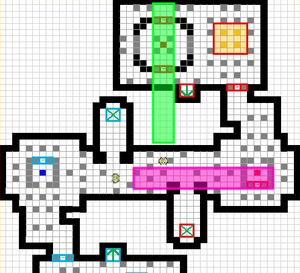
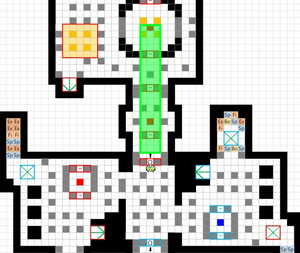
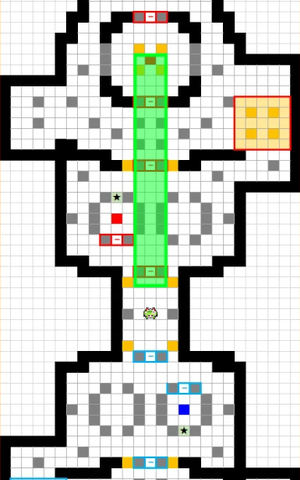
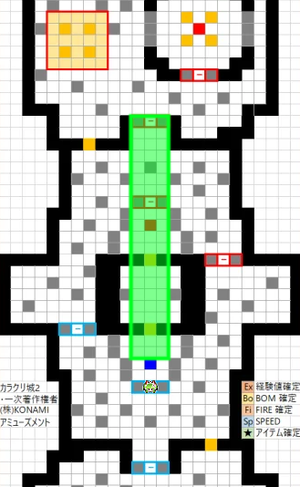
- Shots tend to come out quickly compared to other shooters. Use this to your advantage.
- Horn Sniper Rifle has ridiculous range. You can shoot people off screen if you use the mini-map as your guide.
Fun Facts[edit | edit source]
Birthday: December 24th


