Techniques
Technique Guide
Finding a way to advance your skill gap between veteran players can be tough, but it's not impossible. In a game where players can phase through placed bombs, anything is truly possible with a little bit of practice and game knowledge. For the purposes of time, here are a few documented methods of improving your gameplay at Bombergirl.
General Bomb Combinations
Before even starting, it's important to know how priming and desyncing works in BG. Once understood, a majority of these techniques can become second nature. With that out of the way, let's take a look at common tactics for...
Digging
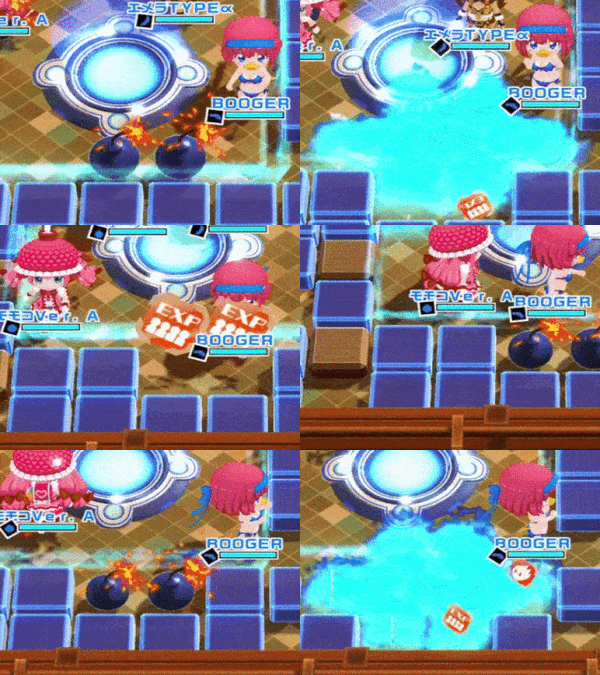
Stacking Bombs
The easiest and most reliable way of getting places without getting stunned! Right?
This combination can be used at any point of the game but should always be used as a way to obtain the most amount of resources.
- Try using this in certain corners to gain more power-ups!
- The effectiveness of destruction is very high with this combination, so careful not to destroy blocks that cover chokepoints for your defense.
Spreading Bombs
The standard of bomb digging in Bombergirl, no way you can mess this up
Here we have what players should use at every chance when creating the most orderly pathway for your team to use.
NOTE: This combination is only effective when you have 2+ Fire at your disposal!
- Try using this once more fire and bomb powerups become available to you.
- Use both Priming and Desyncing methods for consistent rapid bomb destruction, your goal is to always arrive first to the middle before the enemy does.
Base/Tower Destruction
The base layout allows many ways to attack the core/tower. These are some ways to effectively bring about their destruction.
Move around and lay bombs on the ground with your [bomb button/hotkey]. Said Bomb will blow up after about 2.33 seconds(140 frames). If you get hit by a bomb, face a negative consequence!
Note: A placed bomb is a physical obstacle. You normally will not be able to pass through a placed bomb. If you lay a bomb below ya, you'll still be able to walk away from your placed bomb. (you can use this as a temporary wall!)
Le Power Ups:
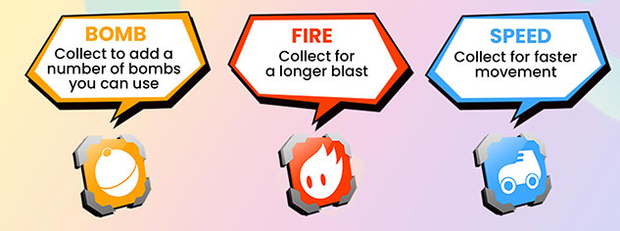
The number of bombs you can drop is determined by your "Bomb" stat. By default you'll start with 2 Bomb stat, but if you want more you'll have to blow up obstacles to obtain a Bomb Powerup.
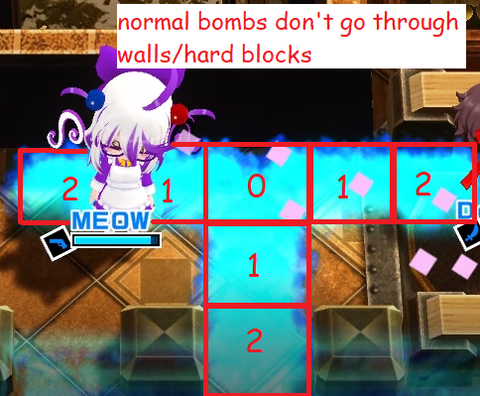
When a Bomb Explodes, It'll send flames in a + shape(north, south, east and west). How far this explosion travels is dependent on your "Fire" stat. Obtaining a Fire Powerup will increase the distance the flames travel by 1 grid unit in each direction.
Note: Flames linger for a split second after explosion, 0.5 seconds to be exact!
Grabbing a Roller Skate Power up will increase your movement speed.
Chain reaction: When the flames from one bomb touch another bomb, it will set that bomb off early!
If you lay out a series of bombs with the intention of having the last bomb blow up early due to a chain reaction, that is called Priming.
Hard block: This is an obstacle on the field that cannot be blown up/destroyed. Normal bombs' explosions cannot pass through these.
Soft block: This is an obstacle that can be destroyed. Sometimes these will contain a powerup. (Blocks created by a blocker's skill will NEVER contain powerups.)
Now that we've got that explained...
Trapping
One major difference with Bombergirl compared to most Bomberman games is you now have a health bar. (Meaning you won't die from a single bomb explosion. Use this to your advantage.)
Death & respawning: When you run out of HP, your character will succumb to their injuries.
After about 5-6 Second you will either respawn at your home respawn point, or (if available) the furthermost ally midway respawn Point.
You will be blessed with a spicy drawing while waiting for the respawn timer.
Note: After death, you will usually drop one of your powerups. (Usually what you drop is what you have the most of at that moment.)
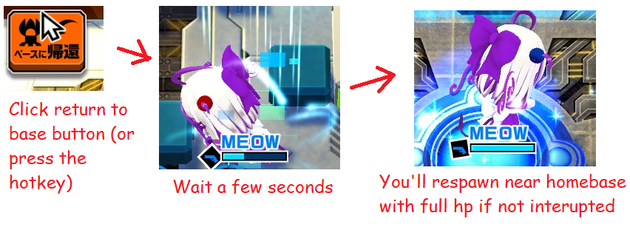
Return to base: At any point in time, except while inside the initial safe zone/spawn point, you can press the "Return to base" button to return to your home base's safe zone/spawn point. Starting the process will make your character vulnerable for about 4 seconds, any interruptions will stop the process. If successful, you'll re-appear at your base's safe zone with full health.
You will also have access to Skills that'll help you defeat your opponents/complete your objective.
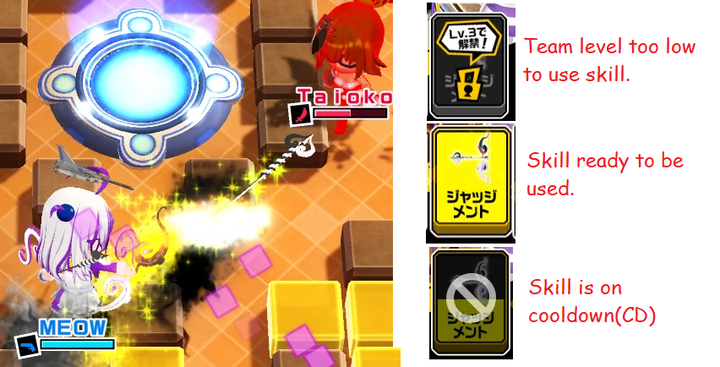
Skills: Assuming you meet the team-level requirement for said skill, you'll be able to use it!
Skills can range from anything; a long/short ranged attack... a bigger bomb... jumping over a wall... or creating Soft Blocks, etc.
Once the skill has been executed, it will enter a cooldown period (CD). During such a period, you will not able able to use said skill again till the CD is over.
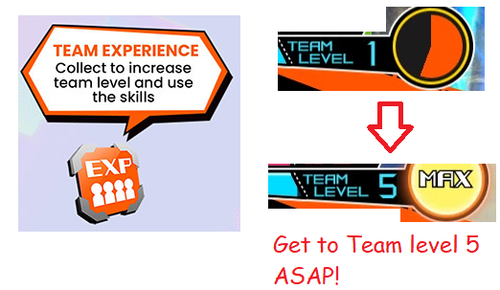
Team Level: As you blow up soft blocks, towers, etc., you'll obtain EXP Power ups. Grabbing these will level up your team! Having a high team level increases your maximum HP and gives you access to more skills. So make sure to Level up to Team Level 5 (which is the level cap) ASAP!
As for what to blow up.....
Blue Vs Red: On your screen; your own team's [bombs(+flames), Minbos(minions), gates, towers, base, etc.] will be dyed blue, while your enemy's will be dyed red.
- Touching the flames of your own team's bomb(blue) will stun you for a few seconds.
- Touching the flames of an enemy bomb(red) will make you lose HP.
- Touching an enemy's Minbo will make you lose HP. (The Minbo will die after hurting you)
- You can freely pass through an allied gate, but not through an enemy gate. (You'll hafta break it first!) Note: Bomb flames cannot go through a gate! The exception to this rule is Screw Bombs and big bombs!
- Gates will automatically attack nearby enemies with electro-orbs. Electro orbs deal 40 damage.
- Towers and Bases will actively spawn Minbos to defend itself. These 2 structures tend to be protected by gates.
Base: Destroy the Red base and you win lol (else protect the Blue Base)
Towers & respawn points: When you blow up an enemy tower, it'll become an ally midway respawn Point. Soft blocks placed on a respawn point will prevent any further respawns until cleared.
TL:DR: Blow up red stuff, protect/don't blow up blue stuff
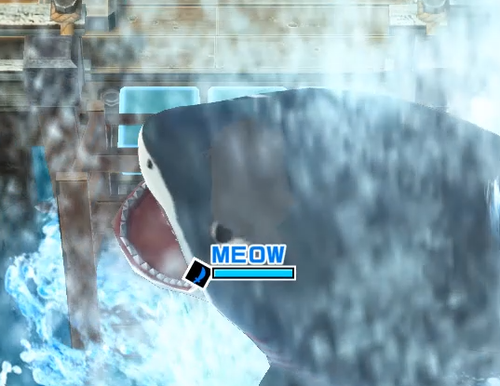
Random Map BS: Sometimes sharks will try to eat ya, or trains/snowballs will try to run ya over... keep an eye out for map hazards. ;3
Sun Tzu The Art of War
Unlike the normal Bomberman free-4-all match, Bombergirl is a 4v4 MOBA(multiplayer online battle arena) game.
You will have to deal with a (maybe) intelligent enemy team, while also trying to synergize with your geeeenius team-mates in order to pull out a victory!
Roles
There 4 types of character in this game, and they generally have a role that they can fulfill. Do note that while there is a preferred role for each type of character to fulfill, you are always free to think outside the box and try going rogue with your own strategies. If it works you are a hero! But If it doesn't work...😅
Bombers tend to have a high bomb capacity and can generally use specialized bombs. Good for clearing out soft blocks and demolishing enemy structures.
Shooters tend to have strong ranged attacks. (Ones that are useful for attacking enemies while hiding behind allied fortifications.)
Blockers tend to have the ability to generate soft blocks and heal allies and structures. Said soft blocks, if placed on a respawn point, will prevent any further respawns until they are cleared.
If you heal a structure that hasn't be detonated yet, it'll revive the structure!
Attackers tend to have melee attacks for dispatching enemy players. Said melee attacks also tend to have i-Frames (invincibility frames) attached to 'em that let you dodge enemy attacks/bombs.
Attackers also tend to have skills that help them bypass the enemy's fortifications.
Note: Each character has their own designated skills + minimum/maximum stats. Make sure to be wary of them!
There are many "Roles"(Such as: Demolisher, Sneaky-cunt, Healer, Sniper, etc.),
but they usually fall under two Categories: Offense & Defense.
Offense's job is to break all of your enemies' stuff. Bases, towers, Bombergirls, Minbos, etc. If it's blocking your path to victory, you either gotta destroy it or bypass it.
- Clear soft blocks to allow easier access to the enemy's base
- Defeat enemies... to allow easier access to the enemy's base
- Break enemy gates to allow easier access to the enemy's base
- Blow up the Enemy tower to open up the midway respawn point(optional)
- Somehow get into the base and blow it up
Generally the role of offense goes to the Bomber & the Attacker.
Defense's job is to prevent the enemy offense from doing stuff. ¯\_(ツ)_/¯
- Generate blocks to slow down the enemy attacker's progression (preferably at key chokepoints)
- Kill the enemy's offensive players
- Annoy the enemy
- Use skills to heal ally Structures to prevent them from blowing up
- Keep the enemy out of the base (via death, blocks, bombs)
- Clog up their mid respawn point with blocks (Some rare stages have this as being optional, but it is often recommendable)
Generally the role of defense goes to the Blocker & the Shooter.
The 3 Phases
While the game itself doesn't explicitly mention any of these phases, matches tends to operate in 3 phases.
Being familiar with each game phase will give you a general idea of what needs to be done to advance towards your ultimate goal of destroying the enemy base. Knowing when to do the right action is hugely important!
Early game:
During this phase, it is important to Dig, which means blowing up soft blocks for power-ups. Aside from gaining personal power ups your main objective is to reach team level 5 as soon as possible. Ideally you can get there before your opponent does. Having a team-level advantage will allow you to use stronger skills to push past the mid-point before your enemy can.
As for other objectives... where you Dig is important. While you are free to dig anywhere, digging in strategically valuable places will help push the objective while also preparing your team for the upcoming offensive. Generally you want to try to dig towards the enemy, usually their tower or gate. This will be give your offensive players quicker access to them when the mid-game starts.
Blockers tend to manage the blocks directly around or inside the base. Dig as much as possible.... without threatening the security of your base. Make sure to generate blocks in strategic locations to fortify your base from intruders. Generally you wanna be still able to enter your base and you only want to clog up half of your base. Pick left or right. You've gotta leave room for the Shooter to move around while defending.
Mid game:
It's very important to know when the "mid game" starts. Generally when teams hit around lvl 3-5 and/or when one of teams starts to push the mid-point objective(Enemy Tower) is when the "mid game" starts.
Keep an eye on your enemies' team level!
Around this time, both teams will start getting into skirmishes with each other in order to gain ground. It is very important to break through the enemy's advance and draw the battle line(s) in your favor.
There are two objectives for this phase!
- Destroy your enemies tower to open up an ally Midway respawn point. (Technically I guess it's optional.)
- Make a pathway to your enemy's base. (Via clearing blocks, enemies, gates, etc.)
During this phase, the normally defensive players will have a chance to assist the offensive players push through the enemy line! Though at some point in time, you'll have to shift over to handling the enemy's offensive players. Keep an eye on your mini map. If your base/main-chokepoints are in danger, get back to it ASAP!
End game:
The midgame and endgame tend to blur together.. but around when (the towers are blown up -> Base gates are blown up) is when the endgame starts.
Offensive players:
- Blow up the base. (Main objective!)
- Keep the pathway to the base clear. The more access points into the enemy base... the better.
- Keep the ally midway respawn point active, assuming it's part of your team's game plan for the stage.
- Kill the enemy players if it helps push the objective!
Defensive players:
- Heal structures such as the base when possible.
- Keep the pathway to the base blocked. The less access points into your own base... the better.
- Clog up the Enemy midway respawn point to prevent them from respawning there. The blocker just has to drop some block onto it disable it!
- Annoy and/or kill the enemy players
- If the opportunity arises... join the Offense!
Game is Done when time up or a base blows up.
Teamwork makes the Dream work
You know what they say~ "Apes together strong." Aside from pure mechanical/game skills, good teamwork can make or break a match.
Communication:
To get the best teamwork, communication is usually good way to get things running smoothly. Whether it be forming a team plan/strategy, or just saying which soft blocks you're going to blow up, Communicating with your teammates will make the experience smoother, while also giving you an edge on the opponent.
- If you chat directly talk with the your teammates, that is the most effective method of communication.
- Otherwise using the in-game chat voices or map chats would also be pretty effective. Let people know where you are going, or where you need help.
Note: There is no way to "party up" with particular people on the Konaste version of the game. So good luck playing with pugs/against your friends...
Team Synergy:
Sometimes characters just "play well" together. Here are two basic examples:
Blocker + Shooter.
- Blockers can create soft blocks to prevent enemies from getting within melee range.
- Shooters can shoot projectiles over said soft/hard blocks to defeat enemies before they get close.
- Blockers keep enemies out of melee range, Shooters eliminate enemies before they get a chance to break through/get close.
Bombers + Attacker.
- Attackers have melee attacks are are good for dispatching enemy players, but tend to have low "bomb" power
- Bombers have very high "Bomb power" but aren't very good at dispatching enemy players
- Bombers help Attackers get past fortifications & Attackers help Bombers deal with enemy players.
There are plenty of other synergistic relationships like this. These are just two very basic interactions.
Some of the better synergistic relationships in the game tend to be between two unique characters instead of just type-to-type.
Counter pick:
Lot of unique characters tend to have a very unique gimmicks/skills that make them VERY good at doing specific task. Sometimes this "task" can be very daunting to overcome with standard characters, so this is where "counter picks" come in....
A "counter pick" is when you deliberately select a character to counter your opponent Bombergirl. Usually said "counter pick" is able to counter or nullify the unique gimmick of the targeted character.
Here are two basic examples:
- Urushi can turn invisible to some sneaky plays🐀. Olive's homing missiles are able to seek out invisible RATS.
- Kuro's gigantic bombs can do a MASSIVE 500 Damage. Grim Aloe can convert said bomb into a soft block 🧱.
